Welcome to the second – and final – part of our voicebot implementation guide. In the previous article we introduced voicebots as a concept and provided you with the knowledge you need to successfully deploy your very own bot. Today, the real work begins. Time to roll up your sleeves and dig in – today, we’ll show you how to implement a bot from scratch, step by step.
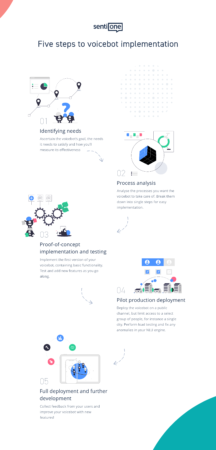
Step one: requirements and processes
We know there’s a problem that needs to be solved, and we know that a voicebot is the perfect tool for the job. This, however, isn’t enough to start! Just like in construction, the quality of our foundations will decide whether our project is successful.
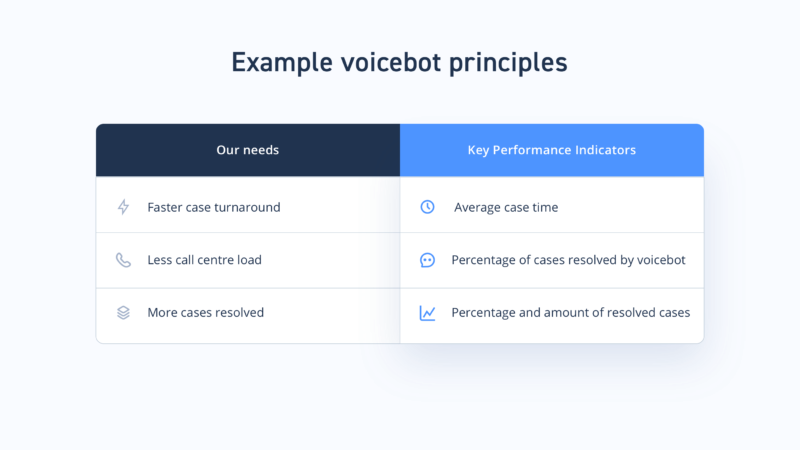
Above everything else, we need to properly define our requirements – we’re aiming for maximum detail! We also need to set KPIs – Key Performance Indicators – which will be used to measure the effectiveness of our bot, as well as the methods it’ll interact with our clients and what its personality is going to be like.
This sounds like a lot of work. It’s worth remembering, however, that time spent during this stage will save us a lot of work further down the line. Here at SentiOne, we approach this like a workshop attended by everyone involved in the project: managers, contact centre workers, analysts and our experts.
The goal of this workshop is to set up project parameters I already mentioned. We also define the overall goal – the problem that needs to be solved, dissected into its basic elements. The more detail, the better!
During this stage, we also identify who our voicebot’s users will be. We’re not just talking about our clients! Our employees will interact with the bot more than anyone – as such, they’re also considered its users. Remember about them when designing your voicebot’s interfaces.
Finally, think about your bot’s presentation. Its personality is crucial – you can, after all, design the ideal brand representative. Consider what impression you want it to leave on your customers. Will you give it a name? A gender? A specific tone of voice? Maybe some quirks or personality traits to make it memorable?
The result of all these preparations will be a design document that will sum up every single aspect of your voicebot. It is this document that you’ll be consulting during the next steps.
Step two: process analysis
Design document in hand, we’re ready to start working on process analysis. It’s a necessary step in any kind of automation – voicebots included.
But what is process analysis? Simply put, it’s the practice of considering every task we want to automate in the most detail possible. By going as deep as possible, we identify those parts of a process that reoccur the most – these tasks are prime candidates for automation.
By analysing what our customer service agents do, we can separate tasks into those that are complex and require a human touch, and those that are simple and that can be easily automated. The latter group will be the most numerous one – but just one voicebot is enough to take care of them all.
However, the further you go, the more you’ll notice that not all cases fall into this binary. You will then have to decide which ones are better suited for our voicebot, and which one should be left in the hands of your customer service team.
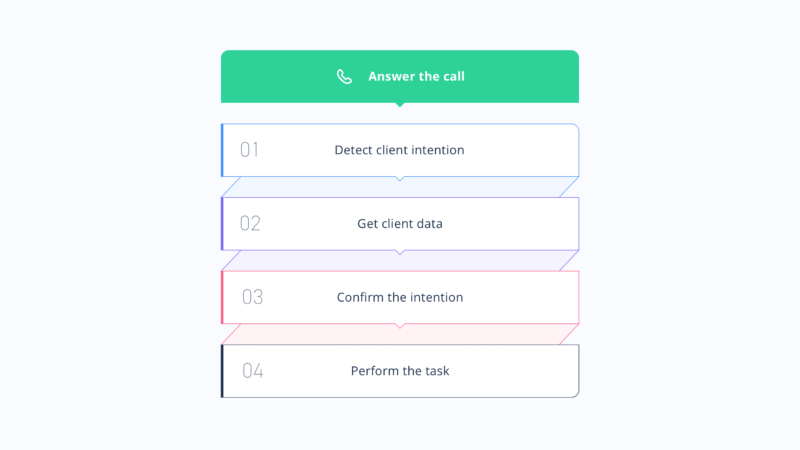
Once you have a list of processes that you’d like the bot to take over, break them down into individual steps. Construct diagrams that describe each process in minute detail. Think of it as of writing down one of your family’s secret recipes – leave no detail out.
Next, prepare a list of phrases that the bot will need to recognise for each task. After all, any question can be asked in a multitude of ways. Use historical data to predict as many varieties of each question as possible. Prepare a varied set of answers for each question, as well.
During this step you might encounter tasks that are too complicated for the initial version of the bot, but that are still worth automating. Take note of them on a separate list – you’ll implement them once your voicebot is up and running.
Step three: implementation and testing
In this stage we’re finally starting to build our bot. Using the SentiOne Automate platform, we’ll prepare a proof-of-concept implementation.
We’re going to start by defining each task you chose for automation. During this step we’ll also connect the SentiOne Automate platform with external systems required for the bot to work. This means your client database, CRM, the calendars used by your salespeople and service personnel – after all, you want your voicebot to be as autonomous as possible. Providing the voicebot with access will allow it to perform its tasks without requiring human intervention.
Don’t worry – voicebots can’t use access to your database to gain sentience, like in The Terminator. This is because during this stage we also define the permissions our bot will have with regards to external systems. For instance: if you’re running a bank, this stage is when you’ll decide which data the bot will have access to (checking account balance or loan status) and which tasks will require human confirmation (approving a loan).
Once every process has been implemented, we’ll move to training the voice recognition algorithm. Remember the list of questions from the previous step? This is the stage during which we’ll constantly ask these questions to our germinating voicebot. With each repetition, we’ll choose a different accent, voice timbre or speed. The point is to help the bot recognise commands accurately, no matter what kind of voice it encounters.
At the same time, we’ll prepare test scenarios for each of our processes. The next couple of weeks will be spent evaluating how the voicebot performs with different tasks. The more variance in test scenarios, the more potential issues and improvements we’ll discover – as such, this stage is extremely important!
After the initial testing phase, we’ll re-evaluate our initial process assumptions, as well as implement fixes for any reported bugs. Who knows? Perhaps we’ll discover a simpler – or an user-friendlier – way of going about things?
Once we’re satisfied with our voicebot’s performance, we’ll proceed to the next step – NLU engine optimization. The NLU (Natural Language Understanding) engine is what allows our bot to analyse and process speech. We’ll expand the amount of phrases and improve intent detection, as well as continue improving our training models.
Finally – performance. Until now, our bot was only tested by a handful of testers using just a few questions. Once we’ve done our first optimization pass-through, we’ll push it out into deep waters. Will it be able to handle a dozen conversations at once? A hundred? A thousand?
This is the most work-intensive stage. It’s all worth it, though – as a result, our voicebot will come out into the world battle-hardened and ready for anything you’ll throw at it in “the real world”. Speaking of…
Step four: pilot production deployment.
It’s time to introduce our bot to the world. Even the most creative testing team can’t hold a candle to real-world users. After all – it is the unfamiliar user that most often comes up with unorthodox ways of using any product.
Remember: “pilot” is the operative word here. We’re not launching the bot fully – yet. Limit the amount of users that’ll have access to it. How you go about it is up to you: you can, for example limit access only to clients from a certain city.
The point is to collect as much data about the voicebot as possible. We’ll analyse recordings and transcriptions of interactions with the bot in order to detect anomalies and errors. We’ll also collect additional keyphrases that we could have missed in earlier stages.
We’ll measure the bot’s effectiveness using specific indicators: F1, Precision, and Recall. This data will serve to further improve the NLU engine. This, however, isn’t everything – after all, the bot was meant to serve a specific purpose. For that reason, we’ll start tracking the KPIs set in the first stage. By comparing its results with our targets, we can determine how ready the bot is for a full-scale deployment.
Step five: production deployment and further development
This stage is the conclusion of our efforts – we’re sure the bot is able to effectively perform its function.
We can start bragging about looking into the future on social media. Our employees can breathe a sigh of relief – they won’t have to answer the same questions dozens of times each day.
Our clients will also appreciate the bot: they can use it to take care of their business on their own, while those with more complex tasks will know that agents can devote as much time as needed to their cases. Everybody wins!
This isn’t the end of our adventure, however – why, it’s just the beginning! Remember how in the second stage we prepared a list of additional functionalities to implement? This is the perfect time to start thinking about them. Pull the list out of your drawer and use your newfound knowledge and experience to improve your voicebot.
A full launch of a voicebot is something of an uncertainty – after all, you can’t predict how many people will decide to try out the new technology. It could be that your bot is wildly more popular than you expected. Consider devoting additional resources to your bot in order to ensure it can handle even the heaviest call loads.
Your clients are a great source of ideas for improvements and new features for your voicebot. Use social listening (*cough* another SentiOne specialty *cough*) to monitor the reactions to your voicebot’s launch. What did your clients like? Were they disappointed by anything? This information is invaluable for further work!
With this, we’ll finish our voicebot implementation guide. You now have enough knowledge to decide whether or not you want to commit to implementing a voicebot. Additionally, you know how much time and effort the process will take. You also know what all the required steps look like – in other words, you’re ready to begin your voicebot adventure. There’s nothing left for us but to wish you good luck! Go forth – and conquer!